How to organize kids art supplies comes down to one rule: every category of supply gets its own visible home at your child’s height, so they can find it and put it back without asking you. The whole job takes an afternoon, and almost everything you need is already in the house.
The reason art supplies beat out toys as the worst clutter in a kid’s room is that they are small, loose, and constant. A single box of 24 crayons becomes sixty loose crayons the moment somebody steps on it, and then nobody wants to dig through the pile again.
Once each category has a clear bin in a fixed spot, cleanup stops being a sorting job and becomes matching items to their home. Kids craft more, you stop finding markers under furniture, and the playroom floor stays clear.
Table of Contents
- What You Need
- How to Organize Kids Art Supplies Step by Step
- 1. Sort supplies by type and frequency of use
- 2. Choose child-accessible storage zones
- 3. Use labeled bins for easy cleanup and retrieval
- 4. Store paper flat and protect it from damage
- 5. Create a simple art-supply station
- 6. Maintain the system with a five-minute reset
- Common Mistakes
- Frequently Asked Questions
- What is the best way to store kids art supplies?
- How do I organize crayons and markers so my child can find them?
- How do I keep glitter and paint out of reach of a toddler?
- How do I store large paper and posters so they stay flat?
- How often should I go through my kid’s art projects?
- Do I need a dedicated art room to keep art supplies organized?
- Conclusion
What You Need
You do not need a new storage system or a dedicated art room. You need about five things, and most families already own four of them.
- Clear containers. Clear plastic bins, jars, or cups so kids can see what’s inside without opening anything. This is the single highest-value item in the whole setup.
- Drawer dividers or a small tray. For the drawer-based approach, these turn one deep drawer into four shallow ones that are easier to reach into.
- A paper storage spot. A vertical file holder, a magazine rack, or a wide flat bin kept under a bed.
- A drying and display area. A wall clip, a drying rack, or a clear basket for wet paintings and finished work.
- Child-safe cleanup supplies. A damp cloth, a small bin for the trash, and a low shelf where all three live together.
- Labels. Printed picture labels for pre-readers, or a label maker for mixed-age households. Masking tape and a marker work fine too.
One honest note on labels: a picture of a crayon box taped to an opaque bin teaches your child nothing. Match the label to what they will actually pull out, or skip the label and switch to a clear bin.
How to Organize Kids Art Supplies Step by Step

1. Sort supplies by type and frequency of use
Spread everything out on the floor first, in one spot, all at once. Sorting supply by supply from a cupboard is how projects get abandoned halfway through.
Split the pile into two groups. Daily-use items are what your child reaches for most weeks: crayons, washable markers, pencils, glue sticks, paper, safety scissors. Special-occasion items are holiday-specific crafts, seasonal sidewalk chalk, or leftover kit supplies you keep meaning to use.
Now purge while everything is visible. Throw out dried-out markers, broken crayons, crumbly playdough, dried paint, empty glue sticks, and coloring books that are more than half finished. Families who cut their supply pile this way often report their kids suddenly using what is left far more often, because there is less to dig through.
2. Choose child-accessible storage zones
Kid height is the rule of thumb: the top of a container a child can reach while standing on the floor, roughly their raised-arm height, not yours.
Everything in the daily-use zone sits there. Anything heavy, sharp, breakable, messy, or small enough to swallow goes higher up or in a latched cabinet. Paint, glitter, loose small parts, and anything with a choking-hazard size for a younger sibling all belong above reach, not inside the reach bin.
Watch the failure point most systems hit: stacking two high so the bottom bin is convenient. Once the top container comes out and goes back on a different stack, the whole thing gets ignored. If a bin only an adult can reach, expect an adult to be re-filing it every week.
3. Use labeled bins for easy cleanup and retrieval
One category per bin. A single bin holding crayons, markers, and colored pencils together becomes a bin nobody digs through, and kids solve that by dumping the whole thing out to find one blue pencil.
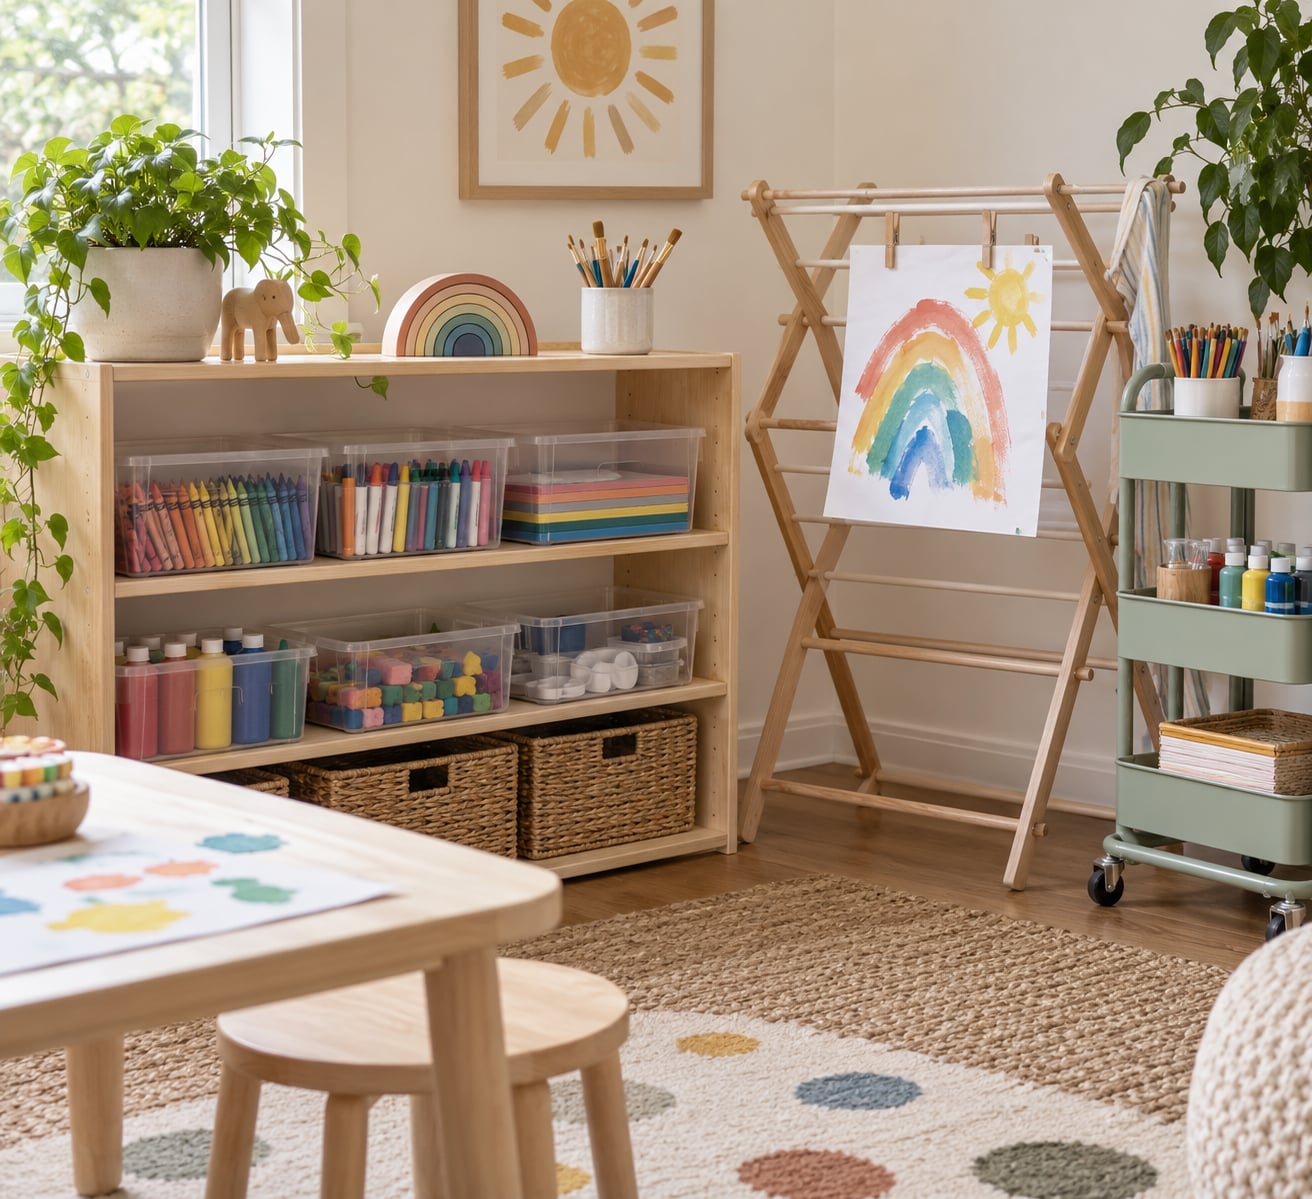
Sort loose crayons and markers by type into separate clear containers, and give paper, scissors, glue, and paint their own bins rather than sharing a general craft box. A wall-mounted pegboard is the same idea in vertical form, and it tends to have the biggest effect on cleanup: every item has exactly one visible place, so returning something takes no decision at all.
Label the front of each container with both a word and a picture. Pictures matter most for pre-readers and for homes with kids at different reading levels, since a four-year-old and a nine-year-old can share the same bin system if the labels work for both.
4. Store paper flat and protect it from damage

Paper gets its own slot because it is the one supply that damages itself. Construction paper stored in flat loose stacks curls, slides, and creases from the weight above it.
Stand paper sheets upright in a file holder or magazine rack so nothing is resting on top of them. A vertical file holder with three or four slots is enough to separate drawing paper, construction paper, and card stock. For oversized sheets, poster board, or a large roll, a shallow flat bin slid under the bed works well.
Finished artwork is a different category from blank paper. Keep the pieces you want in a portfolio folder or an album stored flat rather than leaning against a wall or stacking them on a shelf, where edges curl and corners crease.
5. Create a simple art-supply station
A station is just four things in the same place: a work surface, a supply caddy, a drying area, and a cleanup basket. That is it. When the art table is in the kitchen, the station is in the kitchen, not in a closet down the hall.
Distance kills the habit. When supplies live in a different part of the house from the table, kids stop making the trip and stop crafting.
If you do not have a permanent art table, use a rolling cart with a bin on each tier and casters that lock. It travels to the table, the floor, or the kitchen counter for a Saturday session, then parks back in a corner. A counter-top tub is another cheap option, but keep it away from where food gets prepped or supplies will migrate into the kitchen.
6. Maintain the system with a five-minute reset
Organizing once is not the hard part. Keeping it is, so build a short reset into the end of craft time: five minutes, timer on, everyone returns items to their labeled bin, wipes the surface, and throws the paper scraps away.
Restock as you go. If the marker bin is empty, that is not a failure of the system, it is just the next errand on the grocery list.
Do a bigger purge on the school calendar, usually at the start of a new term. New school projects and goodie bags bring in a constant stream of new supplies, and one scheduled afternoon keeps the pile from compounding. Dry paintings coming home from school need a day to dry flat before they go into a folder, which is worth saying out loud, because teachers mention it constantly in preschool and daycare communities.
Common Mistakes
Too many categories. Twelve bins, each holding three items, take longer to maintain than they save. Group into about six broad categories: drawing, painting, cutting and gluing, paper, messy supplies, and special projects.
Unlabeled or mismatched containers. If the label shows the original box rather than the contents, it is decoration. Fix: match the label to the item, or switch to clear bins so the container explains itself.
Everything stored out of reach. A system only an adult can use becomes an adult chore within a week. Fix: keep the daily-use zone at kid height and move the adult-only items to a separate, higher home.
Sharp or unsafe items in the reach zone. Scissors, small tools, loose glitter, and paint need to sit above reach or in a secured cabinet, especially with a toddler in the house. Fix: audit the reach zone for anything that is sharp, breakable, toxic, or small enough to choke on, and move those items up.
Paper stored in a flat pile. Sheets curl and crease under the weight on top. Fix: stand paper upright in slots, and keep finished artwork flat in a folder.
No maintenance rule at all. The system drifts within weeks without a reset. Fix: five minutes after each session, plus a term-start purge.
One last tip. Keep the setup to about six categories, put the whole thing within sight of the table, and resist adding a new bin until something genuinely has nowhere else to live. The tidy setups you see online usually have fewer categories than you would guess.
Frequently Asked Questions
What is the best way to store kids art supplies?
The best setup is one clear container per category, placed at your child’s height within sight of the table where they craft. Crayons, markers, and pencils each get their own bin rather than one shared craft box, and paper stands upright in a file holder. Keep clear sides on everything so kids can spot the right bin without opening it.
How do I organize crayons and markers so my child can find them?
Sort them by type into separate clear bins, one for crayons, one for markers, one for colored pencils. A shared bin turns into a bin nobody digs through, so kids dump the whole thing out to find a single color. Store each bin at kid height with the label facing out, and do a quick sweep each week to pull up anything that belongs in a different bin.
How do I keep glitter and paint out of reach of a toddler?
Put paint, glitter, loose small parts, and anything small enough to be a choking hazard in a higher cabinet or a latched bin, rather than in the kid-height reach zone. Keep only the safe daily items low: crayons, washable markers, pencils, glue sticks, paper, and blunt-tip scissors. If a younger sibling shares the room, audit the reach zone for anything sharp, breakable, or toxic on the same visit.
How do I store large paper and posters so they stay flat?
Stand sheets upright in a file holder or magazine rack so nothing rests on top of them, which is what causes curling and creasing. For oversized sheets and poster board, use a shallow flat bin slid under a bed or stored along a wall. Finished artwork is a separate category: keep the pieces you want flat in a portfolio folder or album, not leaning or stacked.
How often should I go through my kid’s art projects?
Do a five-minute reset after every craft session to return items and clear the table, then schedule a real purge at the start of each school term. Supplies keep arriving from school projects, goodie bags, and relatives, so a term-start afternoon keeps the pile from compounding. Let wet paintings dry flat for a day before filing them, then recycle the ones you are not keeping.
Do I need a dedicated art room to keep art supplies organized?
No. What matters is that supplies and work surface are in the same part of the house. A rolling cart with a bin per tier handles homes with no art table, and a single drawer with dividers works in a small playroom or kitchen nook. The one setup to avoid is supplies in a closet on a different floor from the table, because kids stop making the trip and stop crafting.
Conclusion
Start this week, not when the playroom feels hopeless. Pick one central location, spread out every supply in a single session, and sort it into about six broad categories: drawing, painting, cutting and gluing, paper, messy supplies, and special projects.
Then give each category one clear bin at your child’s height, label the front with a word and a picture, and put the paper upright in a slot where nothing rests on it. Add a five-minute reset at the end of craft time and a purge at the start of each school term, and the system will still be working months from now.